
Contents
Objective
After reading this Article, You should have an understanding of –
- Purpose of the ui.frontend module
- Understanding the folder structure of ui.frontend
- Setting up the development environment with Node.js and npm
- Webpack basics and its role in building the UI frontend module
- Clientlib generation with frontend module
- Writing components (JavaScript, SCSS) within the ui.frontend module
- Using npm scripts for development tasks (start, build)
- Running a local development server without AEM
Introduction
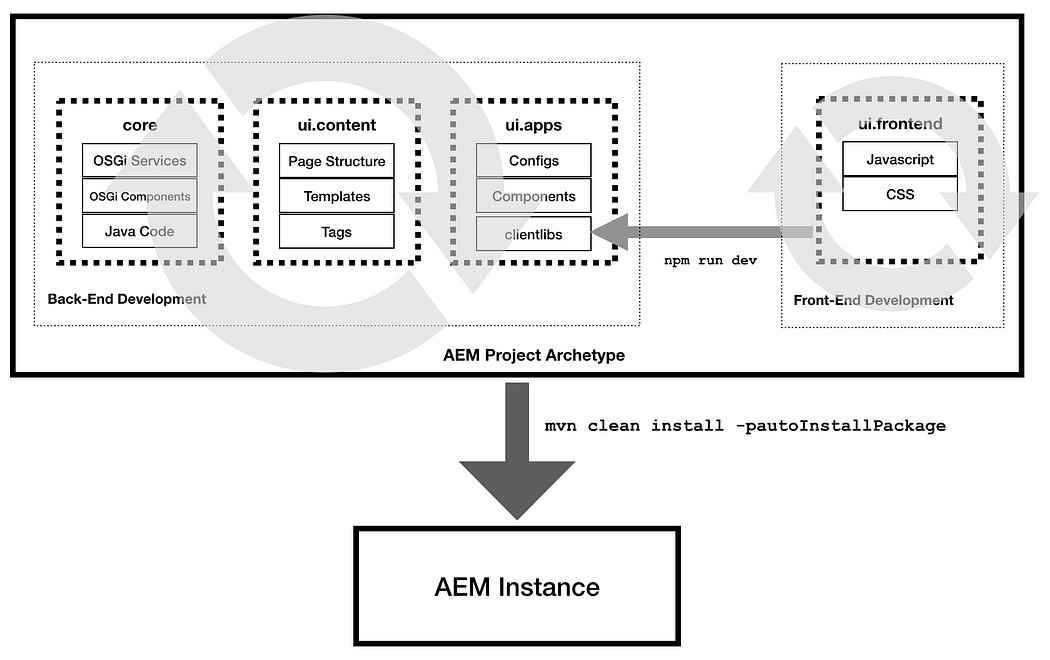
Adobe Experience Manager (AEM) frontend modules, particularly the ui.frontend module, are designed to streamline the development process for front-end developers working with AEM.
The ui.frontend module allows front-end teams to develop pages and components independently using Node.js on a local server, typically running on port 8080, without requiring a local AEM instance. It leverages the aem-clientlib-generator plugin to transfer all compiled CSS, JavaScript, and other resources into the ui.apps module.
Hence, without any further delay, let’s get started:
Purpose of ui.frontend Module
The main purpose of AEM UI frontend modules is to provide a modern and efficient development experience for front-end developers working within AEM. It is beneficial in the following ways:
Modern Workflow: It mimics the development experience outside of AEM. Features like hot reloading and a built-in development server make development faster and more interactive.
Improved Efficiency: Webpack, a powerful tool, handles tasks like bundling code and managing dependencies, freeing up developer time.
Organized Structure: All front-end code resides in a single, dedicated location (the ui.frontend module), promoting better project organization and collaboration.
Flexibility: It integrates with popular front-end frameworks and allows for modern JavaScript features (like TypeScript for type safety). This opens doors for building complex and scalable user interfaces.
Understanding the folder structure of ui.frontend
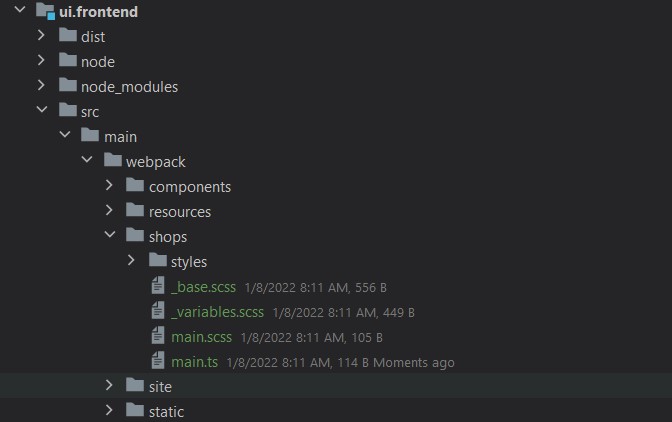
The UI Frontend module was released with AEM Archetype 20. The source code for all front-end assets now resides within the UI.Frontend directory. The below image will show the structure of the module.
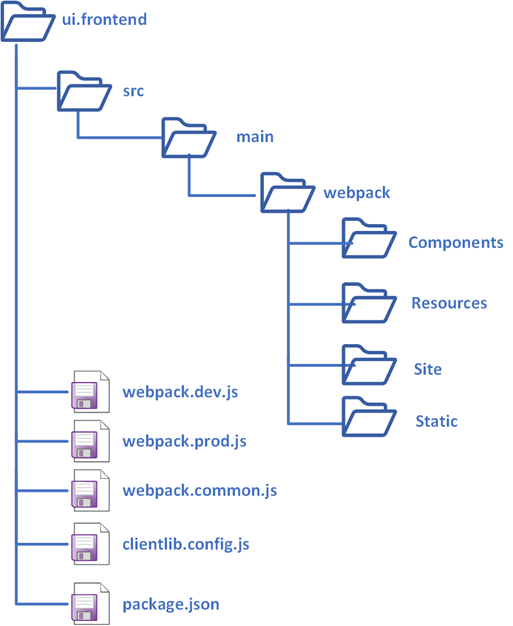
Below are the major and important folders in UI-fronted modules:
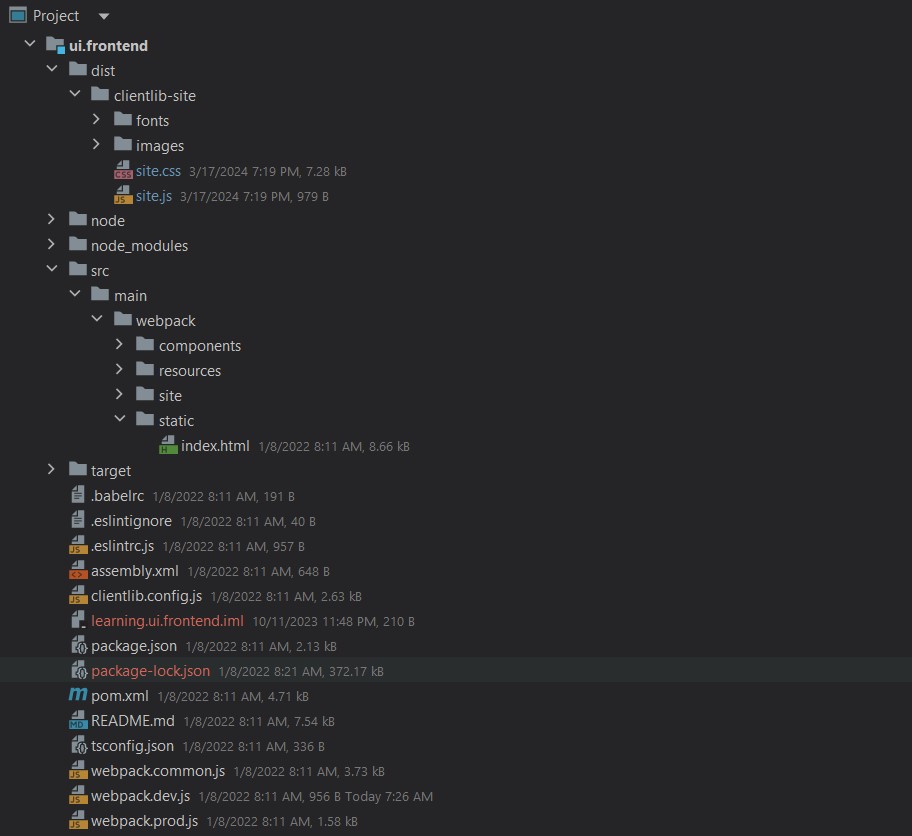
src: This folder contains all the frontend resources, such as JS, CSS, fonts, images, etc. It also includes an index.html file, which is used to load components, CSS, and JS as part of it.
dist: This directory holds the frontend assets like fonts, images, and the minified versions of JS and CSS files. The npm run dev build command helps to move/copy files from ui.frontend/src to ui.frontend/dist and ui.apps folders. The ui.frontend module uses the aem-clientlib-generator plugin to transfer all compiled CSS, JS, and other resources into the ui.apps module.
node: Contains node-related out-of-the-box files and configurations that assist the frontend team in development and testing on a local server.
node_modules: This directory includes all the node modules required for development as specified in the node/package.json file.
Below are the important files and their use in the UI Fronented Module:
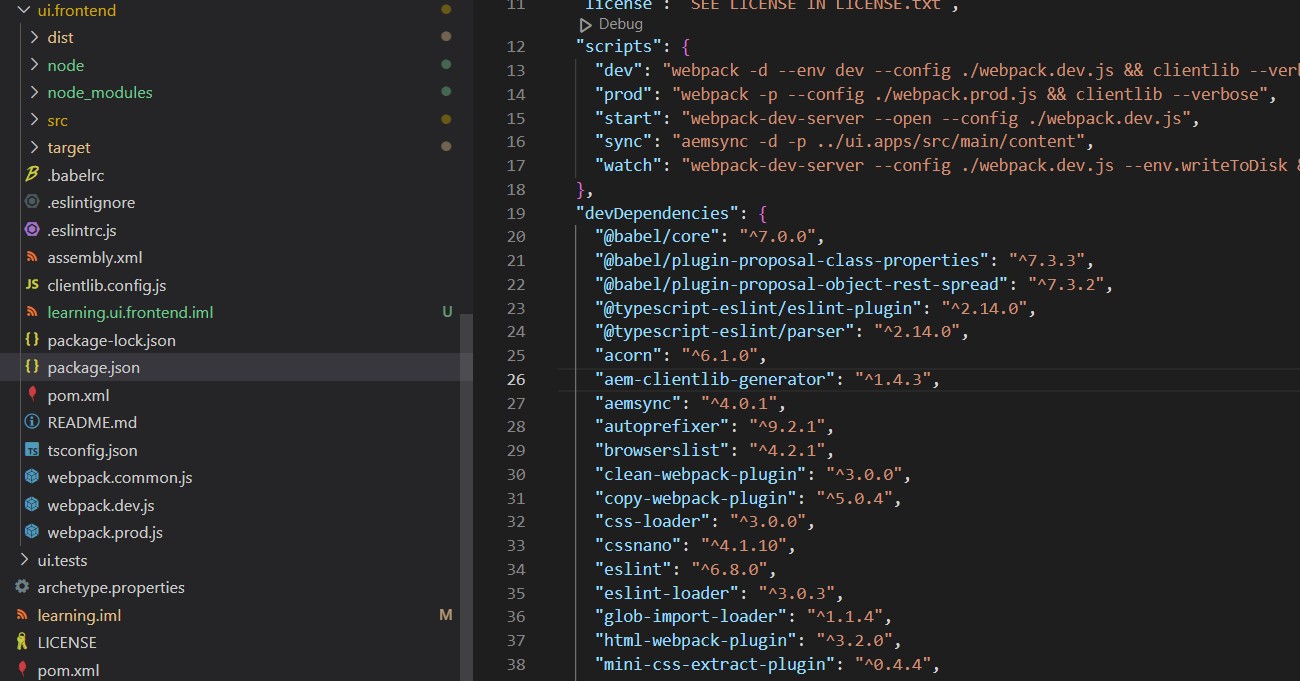
ui.frontend/package.json: This file serves as the project manifest, defining project dependencies, scripts, and configurations. It specifies the tools and libraries needed for development (like Webpack) and defines commands to run tasks (build, start development server).
Important points in the package.json
- “main”: “src/main/webpack/site/main.ts” – this i is the entry point for javascript and typescript, which included the scss.
- “script”: {“dev”:””,”prod”:””} – this is script for different npm commands.
- “aem-clientlib-generator”: “1.4.3” – this is for clientlib generator dependency inclusion.
ui.frontend/clientlib.config.js: This configuration file plays a crucial role in generating AEM client libraries. It defines which source files and directories from the ui.frontend module should be included in the client libraries and how they should be processed. You can refer to the comments within the file below for further clarification.
					const path = require('path');

const BUILD_DIR = path.join(__dirname, 'dist');
//This is ui.apps clientlibs path as ui.apps/src/main/content/jcr_root/apps/learning/clientlibs
const CLIENTLIB_DIR = path.join(
  __dirname,
  '..',
  'ui.apps',
  'src',
  'main',
  'content',
  'jcr_root',
  'apps',
  'learning',
  'clientlibs'
);

const libsBaseConfig = {
  allowProxy: true,
  serializationFormat: 'xml',
  cssProcessor: ['default:none', 'min:none'],
  jsProcessor: ['default:none', 'min:none']
};

// Config for `aem-clientlib-generator`
// This block is for learning.dependencies & learning.site
//Any new clientlibs category can be added similarly
module.exports = {
  context: BUILD_DIR,
  clientLibRoot: CLIENTLIB_DIR,
  libs: [
    {
      ...libsBaseConfig,
      name: 'clientlib-dependencies',
      categories: ['learning.dependencies'],
      assets: {
        // Copy entrypoint scripts and stylesheets into the respective ClientLib
        // directories
        js: {
          cwd: 'clientlib-dependencies',
          files: ['**/*.js'],
          flatten: false
        },
        css: {
          cwd: 'clientlib-dependencies',
          files: ['**/*.css'],
          flatten: false
        }
      }
    },
    {
      ...libsBaseConfig,
      name: 'clientlib-site',
      categories: ['learning.site'],
      dependencies: ['learning.dependencies'],
      assets: {
        // Copy entrypoint scripts and stylesheets into the respective ClientLib
        // directories
        js: {
          cwd: 'clientlib-site',
          files: ['**/*.js'],
          flatten: false
        },
        css: {
          cwd: 'clientlib-site',
          files: ['**/*.css'],
          flatten: false
        },

        // Copy all other files into the `resources` ClientLib directory
        resources: {
          cwd: 'clientlib-site',
          files: ['**/*.*'],
          flatten: false,
          ignore: ['**/*.js', '**/*.css']
        }
      }
    }
  ]
};
ui.frontend/tsconfig.json: The tsconfig.json file is a configuration file in typeScript projects. It allows you to specify compiler options and other settings for typeScript compilation. Similar to how package.json identifies a Node.js project, tsconfig.json identifies the presence of typeScript files in your project.
					{
    "compilerOptions": {
        "target": "es5",
        "module": "es6",
        "baseUrl": "../ui.frontend",
        "removeComments": true,
        "allowJs": true,
        "preserveConstEnums": true,
        "allowSyntheticDefaultImports": true,
        "sourceMap": true
    },
    "include": [ "./src/**/*.ts" ]
}
webpack.common.js: This file contains the base configuration shared between development and production builds. It defines loaders (tools used to process different file types), plugins (tools for additional functionalities), and common settings like code splitting and optimization. You can refer to the comments within the file below for further clarification.
					'use strict';

const path                    = require('path');
const webpack                 = require('webpack');
const MiniCssExtractPlugin    = require('mini-css-extract-plugin');
const TSConfigPathsPlugin     = require('tsconfig-paths-webpack-plugin');
const CopyWebpackPlugin       = require('copy-webpack-plugin');
const { CleanWebpackPlugin }  = require('clean-webpack-plugin');

//Source directory path
const SOURCE_ROOT = __dirname + '/src/main/webpack';

// This will resolve the file type like Javascript and TypeScript.
// It will load the TypeScript configuration
const resolve = {
    extensions: ['.js', '.ts'],
    plugins: [new TSConfigPathsPlugin({
        configFile: './tsconfig.json'
    })]
};

module.exports = {
    resolve: resolve,
    //This is the entry point for TypeScript or JavaScript file
    entry: {
        site: SOURCE_ROOT + '/site/main.ts'
    },
    output: {
        filename: (chunkData) => {
            return chunkData.chunk.name === 'dependencies' ? 'clientlib-dependencies/[name].js' : 'clientlib-site/[name].js';
        },
        path: path.resolve(__dirname, 'dist')
    },
    module: {
        rules: [
            {
                test: /\.tsx?$/,
                exclude: /node_modules/,
                use: [
                    {
                        options: {
                            eslintPath: require.resolve('eslint'),
                        },
                        loader: require.resolve('eslint-loader'),
                    },
                    {
                        loader: 'ts-loader'
                    },
                    {
                        loader: 'glob-import-loader',
                        options: {
                            resolve: resolve
                        }
                    }
                ]
            },
            {
                test: /\.js$/,
                exclude: /node_modules/,
                loader: 'eslint-loader',
            },
            {
                test: /\.scss$/,
                use: [
                    MiniCssExtractPlugin.loader,
                    {
                        loader: 'css-loader',
                        options: {
                            url: false
                        }
                    },
                    {
                        loader: 'postcss-loader',
                        options: {
                            plugins() {
                                return [
                                    require('autoprefixer')
                                ];
                            }
                        }
                    },
                    {
                        loader: 'sass-loader',
                        options: {
                            url: false
                        }
                    },
                    {
                        loader: 'glob-import-loader',
                        options: {
                            resolve: resolve
                        }
                    }
                ]
            }
        ]
    },
    plugins: [
        new CleanWebpackPlugin(),
        new webpack.NoEmitOnErrorsPlugin(),
        new MiniCssExtractPlugin({
            filename: 'clientlib-[name]/[name].css'
        }),
        new CopyWebpackPlugin([
            { from: path.resolve(__dirname, SOURCE_ROOT + '/resources'), to: './clientlib-site/' }
        ])
    ],
    stats: {
        assetsSort: 'chunks',
        builtAt: true,
        children: false,
        chunkGroups: true,
        chunkOrigins: true,
        colors: false,
        errors: true,
        errorDetails: true,
        env: true,
        modules: false,
        performance: true,
        providedExports: false,
        source: false,
        warnings: true
    }
};
ui.frontend/webpack.dev.js: This file extends the common configuration with development-specific settings. It might enable features like source maps (for easier debugging) and source loading from a local AEM instance for live previewing. You can refer to the comments within the file below for further clarification.
					const merge             = require('webpack-merge');
const common            = require('./webpack.common.js');
const path              = require('path');
const HtmlWebpackPlugin = require('html-webpack-plugin');

const SOURCE_ROOT = __dirname + '/src/main/webpack';

module.exports = env => {
    const writeToDisk = env && Boolean(env.writeToDisk);

    return merge(common, {
        mode: 'development',
        devtool: 'inline-source-map',
        performance: { hints: 'warning' },
        plugins: [
            //This is the file which open default on port 8080, we can replace our html in this file
            new HtmlWebpackPlugin({
                template: path.resolve(__dirname, SOURCE_ROOT + '/static/index.html')
            })
        ],
        devServer: {
            inline: true,
            //This will take the proxy reference of AEM like content, clientibs
            //If your instance running on different server you can change the port here
            proxy: [{
                context: ['/content', '/etc.clientlibs'],
                target: 'http://localhost:4502',
            }],
            writeToDisk,
            liveReload: !writeToDisk
        }
    });
}
ui.frontend/webpack.prod.js: This file extends the common configuration with production-specific settings. It might focus on optimizations like minification (reducing file size) and tree-shaking (removing unused code) to ensure a performant website.
					const merge                   = require('webpack-merge');
const OptimizeCSSAssetsPlugin = require('optimize-css-assets-webpack-plugin');
const TerserPlugin            = require('terser-webpack-plugin');
const common                  = require('./webpack.common.js');

module.exports = merge(common, {
    mode: 'production',
    optimization: {
        //This is for enabling minfication
        minimize: true,
        minimizer: [
            new TerserPlugin(),
            //This is for Optimization of CSS files
            new OptimizeCSSAssetsPlugin({
                cssProcessorPluginOptions: {
                    cssProcessor: require('cssnano'),
                    preset: ['default', {
                        calc: true,
                        convertValues: true,
                        discardComments: {
                            removeAll: true
                        },
                        discardDuplicates: true,
                        discardEmpty: true,
                        mergeRules: true,
                        normalizeCharset: true,
                        reduceInitial: true, // This is since IE11 does not support the value Initial
                        svgo: true
                    }],
                },
                canPrint: false
            })
        ],
        splitChunks: {
            cacheGroups: {
                main: {
                    chunks: 'all',
                    name: 'site',
                    test: 'main',
                    enforce: true
                }
            }
        }
    },
    devtool: 'none',
    performance: { hints: false }
});
ui.frontend/src/main/webpack/site/_variables.scss: This file likely contains core SCSS variables used throughout your project. These variables define reusable styles (colors, fonts, etc.) that can be referenced in other SCSS files, promoting consistency and maintainability.
					//== Font
$font-family:           "Helvetica Neue", Helvetica, Arial, sans-serif;
$font-size:             16px;
$font-height:           1.5;

// Normal mode
$color-foreground:      #202020;
$color-background:      #FFFFED;
$color-link:            #2020E0;

// Dark mode
$color-foreground-dark: invert($color-foreground);
$color-background-dark: invert($color-background);
$color-link-dark:       invert($color-link);
ui.frontend/src/main/webpack/site/main.scss: This file serves as the main entry point for your SCSS styles. It likely imports other SCSS files (like _variables.scss) and defines the overall styles for your components or application. frontend module uses SCSS.
					@import 'variables';
@import 'base';
@import '../components/**/*.scss';
@import './styles/*.scss';
ui.frontend/src/main/webpack/site/main.ts (or main.js): This file is the main entry point for your JavaScript application. It likely imports necessary components, modules, and styles (using import statements) and sets up the overall application logic. (Note: This file can be written in TypeScript or plain JavaScript.)
					// Stylesheets
import "./main.scss";

// Javascript or Typescript
import "./**/*.js";
import "./**/*.ts";
ui.frontend/src/main/webpack/static/index.html: This file functions as a fundamental HTML template utilized during the development process. It probably contains a link to the packaged JavaScript file produced by Webpack, enabling you to preview your application in a web browser while developing without needing to deploy it on AEM.
ui.frontend/clientlib.config.js: This configuration file plays a crucial role in generating AEM client libraries. It defines which source files and directories from the UI.frontend module should be included in the client libraries and how they should be processed.
Setting up the development environment with Node.js and npm
In order to gain a comprehensive understanding of the Node.js and npm installations, it is important to first recognize their importance. Both Node.js and npm play a critical role in AEM frontend module development for several reasons.
Server Environment: Node.js provides a server-side environment to run JavaScript, which is crucial for tasks that can’t be performed in the browser. For AEM, it allows developers to run a local development server, often on port 8080, to develop and test pages and components independently without a local AEM instance.
Build Tools: Many frontend build tools, like Webpack, which is commonly used in AEM projects, run on Node.js. These tools are used for bundling JavaScript files, compiling SCSS/Sass to CSS, and optimizing assets for production.
Package Management: npm is the package manager for Node.js and is used to manage project dependencies. It allows developers to install, share, and control versions of packages required for the project.
Client Library Generation: The aem-clientlib-generator plugin, which requires Node.js, is used to move compiled CSS, JS, and other resources into the AEM ui.apps module. This step is crucial for integrating the frontend assets with AEM’s client library structure.
Automation: npm scripts can automate tasks like building, testing, and deploying, which streamlines the development process and ensures consistency across environments.
Now, let’s see the list of common npm commands useful in the AEM ui.frontend module:
Install Node.js
a. Download the latest version of Node.js from the official website.
b. Run the installer and follow the prompts to install Node.js and npm. Node.js comes with npm installed, so you don’t need to install npm separately.
Verify Installation
a. Open a terminal or run the command promt run node -v, which should return the node version number.
b. Run npm -v, which should return the npm version number.
Set Up the AEM Project
a. Open the project in Terminal or IDE Terminal. Navigate to ui.frontend If there is a package.json file present, it means the project is already set up.
b. If the project doesn’t have a UI frontend, we can follow the below two methods to include it.
c. First method: using the frontendModule flag with the Maven archetype. This method is commonly used when creating a new AEM project from scratch.
- Include the frontendModule flag along with your desired option when using the archetype to create your project. The available options are General (default), React (optional), or Angular (optional).
d. Second method: including the UI frontend module in an existing project.
- Locate an existing AEM project that uses the ui.frontend module (or download a sample project) and copy the ui.frontend directory to your project.
- Include the necessary dependencies and plugins from the copied ui.frontend directory’s pom.xml file into your project’s main pom.xml.
- Run mvn clean install in your project directory to install the newly added dependencies.
- Update your project’s client library configuration to include the UI.frontend module resources.
Install Dependencies
a. In the ui.frontend directory, run npm install to install all the dependencies listed in package.json. This command reads the package.json file and installs the required packages into the node_modules directory within your project.
Start the development server
a. You can start a local development server by running npm start with your package.json.
b. This will typically launch the project in your default web browser and watch for changes to your source files, automatically refreshing the browser.
Now, let’s see the list of common npm commands useful in the AEM ui.frontend module:
- npm install: This command installs all the dependencies listed in the package.json file. It’s essential to run this command before working on the project to ensure all necessary tools and libraries are available.
- npm run dev: executes a full build with JavaScript optimization disabled and source maps enabled, along with CSS optimization disabled. This is typically used for development purposes.
- npm run prod: runs a full build with JavaScript optimization enabled (including tree shaking), source maps disabled, and CSS optimization enabled. This is used for production builds.
- npm start or npm run start: This command starts a local development server using Webpack. This server allows you to see your changes reflected in the browser instantly without deploying to AEM. It’s ideal for rapid development and testing with index.html.
- mvn clean install -PautoInstallPackage: This is not a npm command, and it is used to build & deploy the AEM project on a local server. It internally runs npm run prod to deploy the minified js and css into the client libraries and from the client libraries to the AEM server.
Steps to use frontend development without AEM
ui.frontend module allows front-end developers to work independently without relying on a local AEM instance. You can achieve this by following the steps below:
- Navigate to the ui.frontend directory
- Start the Node server with npm start or npm run start. It will load index.html on localhost port 8080.
- Update ui.frontend/src/main/webpack/static/index.html with the page source on which you are working and save the changes.
- If you change any SCSS or JS file, the changes will reflect at the same time on the localhost port of 8080.
- That’s all. Now we can style the page without AEM.
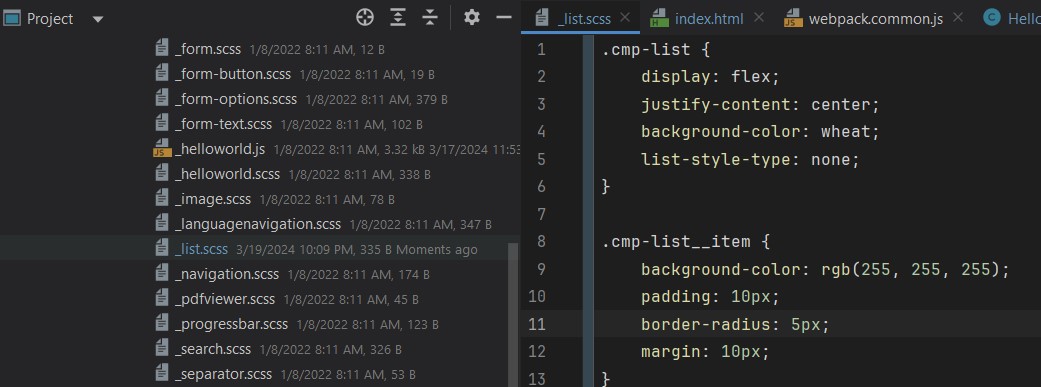
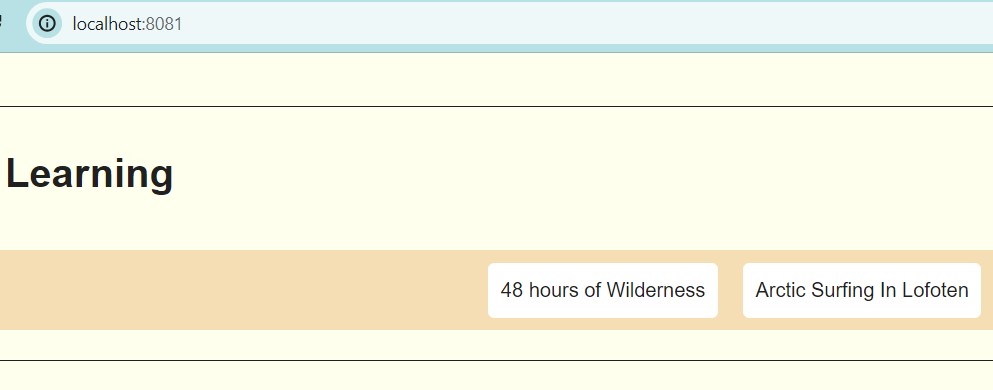
Before the Change
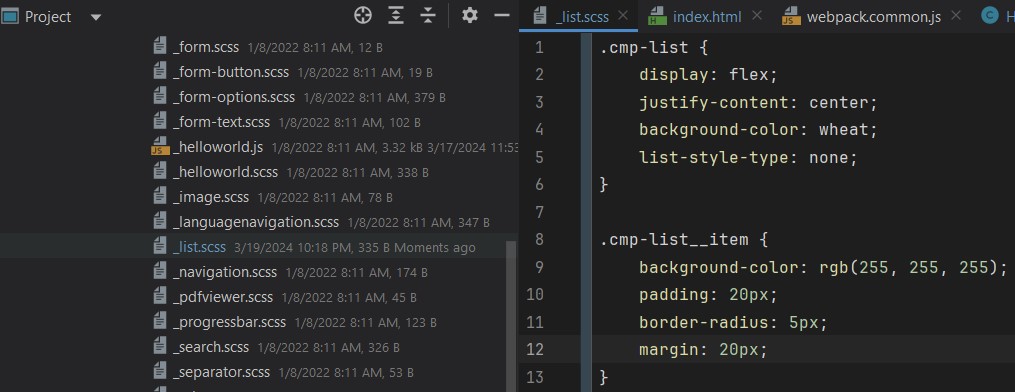
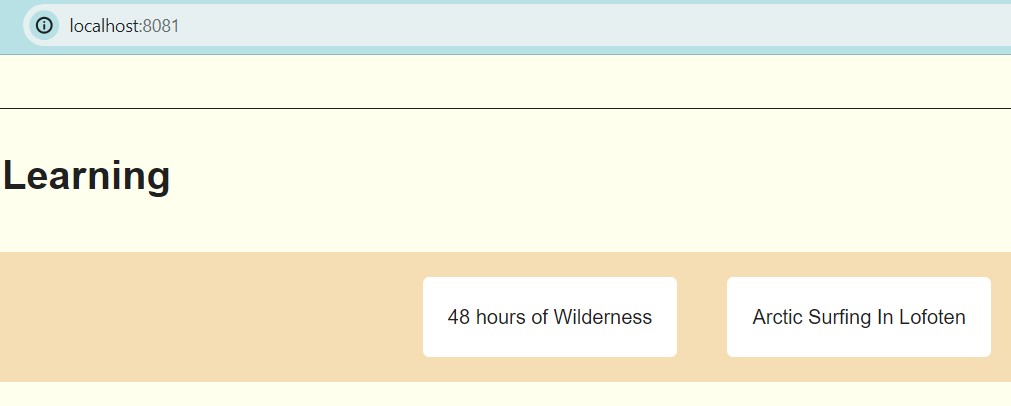
After the Change
Steps to move the code from ui.frontend to ui.apps
To transfer the client libraries from ui.frontend to ui.apps, it is necessary to generate them first. The following steps can be followed:
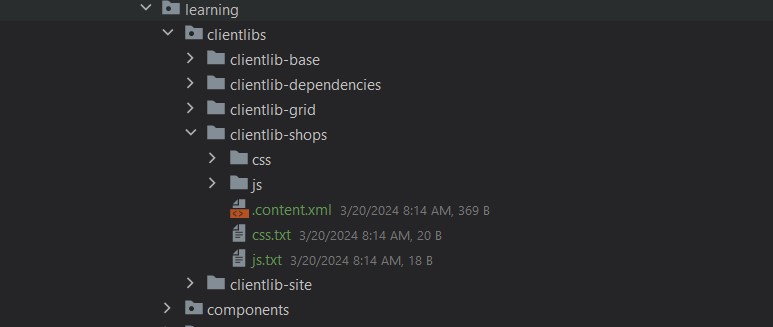
- The aem-clientlib-generator plugin moves compiled CSS, JS, and other resources from ui.frontend to ui.apps. The configuration for this plugin is defined in clientlib.config.js.
- Two client libraries are generated – clientlib-site and clientlib-dependencies.
Move the client library from ui.frontend to ui.apps using frontend build command.
- Run npm install within the ui.frontend folder to install all required Node modules and dependencies.
- Execute npm run dev to create non-minified versions of files and copy them from ui.frontend/src to ui.frontend/dist and ui.apps.
- Execute npm run prod to create non-minified versions of files and copy them from ui.frontend/src to ui.frontend/dist and ui.apps.
Move the client library from ui.frontend to ui.apps using the Maven command:
- Run the command mvn clean install -PautoInstallPackage, It will move the client library from ui.frontend to ui.apps, then from ui.apps to the AEM instance.
Steps to generate new clientlibs categories
To generate new client library categories in the ui.frontend module of Adobe Experience Manager (AEM), you can follow these steps:
- Create the client library folder structure – create a new folder hierarchy that reflects your client library category name. For example, if you’re creating a category named shops, create a folder named shops.
- Update the webpack configuration – modify the webpack.common.js file to include the new client library category. You’ll need to add or update the configuration to handle the new category’s assets.
- Configure the clientlib.config.js file – Inside the clientlib.config.js file, you’ll need to define the new client library category. Duplicate the clientlib-site object and modify it to create the configuration for your new category, such as clientlib-shops.
- Run the build command – Use the npm run dev command within the ui.frontend folder to generate the non-minified versions of your assets and copy them from the ui.frontend/src to the ui.frontend/dist and ui.apps folders.
- Note : You can change the folder structure according to your use case and use the advance feature of scss for frontend developments.


Conclusion
- So in this post, we tried to cover the end-to-end working of ui.frontend module in default mode. In the upcoming post, we will try to cover the inclusion of a story book, react etc. in the frontend module. I hope you enjoyed this post. If you find it useful, leave us a comment. I would love to hear your thoughts and suggestions to make it better. Also, you can connect with me on LinkedIn.
Hi there, I enjoy reading through your article.
I wanted to write a little comment to support you.